Canning recipe for black bean and corn salsa is your ultimate guide to preserving summer’s vibrant flavors for the winter. Imagine the perfect salsa, bursting with fresh corn and smoky black beans, ready to elevate your tacos, burritos, or even a simple bowl of chips and salsa. This guide dives into the science of canning, from the history of preserving food to the best methods for your salsa.
Get ready to transform your kitchen into a food-preservation powerhouse!
This comprehensive recipe covers everything from choosing the perfect ingredients to mastering the water bath canning technique. We’ll explore variations, safety considerations, and troubleshooting tips to ensure your homemade salsa is not only delicious but also perfectly preserved. Plus, we’ll share pro-tips for stunning presentation and delicious serving ideas.
Introduction to Canning Black Bean and Corn Salsa
Hey foodies! Ever wondered how those perfectly preserved jars of salsa in your local supermarket magically appear? Well, it’s not magic, it’s science and a whole lot of careful technique. Canning is a time-honored method of preserving food, offering a delicious and convenient way to enjoy fresh produce year-round. Let’s dive into the fascinating world of canning black bean and corn salsa, and uncover the secrets behind its preservation!Canning, in essence, is the art of sealing food in airtight containers and heating it to a specific temperature to kill off harmful bacteria and extend its shelf life.
It’s a crucial method, especially in eras when fresh produce wasn’t as readily available or as easily transported. Think of it as a culinary time machine, allowing you to savor the taste of summer in the dead of winter. The science behind it is pretty cool – high heat denatures enzymes and microorganisms that cause spoilage, essentially preserving the fresh flavor and texture of your salsa.
History of Canning and its Importance, Canning recipe for black bean and corn salsa
Canning, a revolutionary technique, emerged in the 19th century, largely due to the efforts of Nicolas Appert. He discovered that sealing food in glass jars and heating them to specific temperatures could effectively prevent spoilage. This breakthrough was monumental, allowing for the preservation of food over long periods, reducing food waste, and enabling the development of a more robust food supply chain.
Science Behind Preserving Salsa
The science of canning is based on the principle of eliminating or significantly reducing harmful bacteria and enzymes responsible for food spoilage. High heat, achieved through carefully controlled processes, inactivates these microorganisms, effectively preventing the decomposition of the food. The crucial element is the creation of an oxygen-free environment within the sealed jar, preventing oxidation and maintaining the desired color, texture, and flavor of the salsa.
Benefits of Homemade Canned Salsa
Homemade canned salsa boasts a plethora of advantages over store-bought options. You have complete control over the ingredients, ensuring fresh, high-quality produce and avoiding potentially harmful additives. The taste is undeniably superior, offering a unique flavor profile tailored to your preferences. It’s also often a more economical choice, especially if you grow your own produce. Imagine savoring the vibrant taste of your garden’s bounty, preserved for months to come.
Comparison of Canning Methods
Two primary methods exist for canning salsa: water bath canning and pressure canning. Water bath canning is suitable for low-acid foods with a lower risk of botulism, while pressure canning is essential for high-acid foods, like salsa, to achieve the necessary temperature for eliminating all possible harmful bacteria. The choice of method depends on the acidity of the food being canned.
Necessary Equipment for Canning
Proper equipment is vital for successful canning. A well-equipped kitchen allows for efficient and safe canning procedures. This table Artikels the essential equipment needed for canning black bean and corn salsa:
| Equipment | Description | Quantity |
|---|---|---|
| Canning Jars | Sterilized glass jars with lids and rings. | Based on desired yield. |
| Canning Pots | Large pots for water bath or pressure canning. | One for each method. |
| Jar Lifter | A tool for safely handling hot jars. | One. |
| Ladle | For transferring hot salsa to jars. | One. |
| Canning Thermometer | Essential for precise temperature control. | One for each method. |
| Wide-mouth funnel | For easy filling of jars. | One. |
| Rubber Gloves | To protect hands while handling hot jars. | Pair. |
Ingredients and Measurements
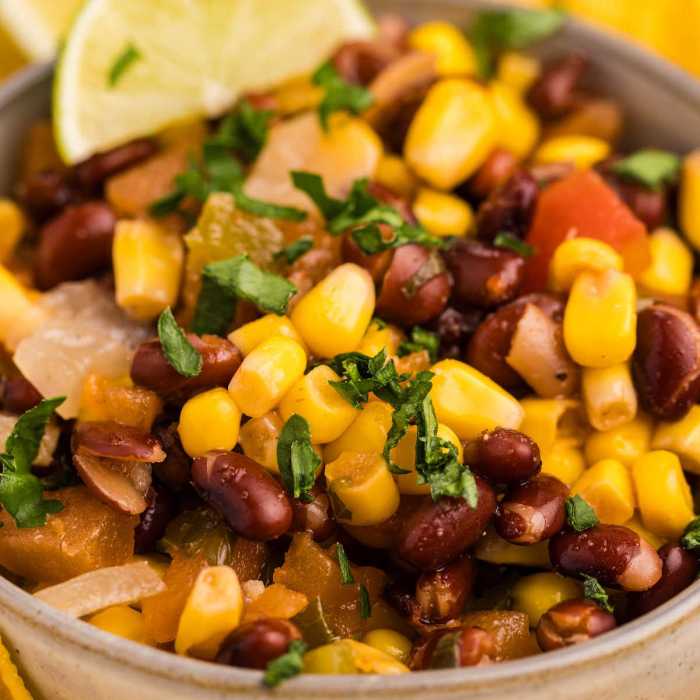
Alright, so you wanna make a killer black bean and corn salsa for canning? First things first, the ingredients are key. This isn’t just about throwing stuff together; it’s about crafting a symphony of flavor that’ll explode in your mouth (and hopefully, in your jars, too!). We’re talking about the kind of salsa that’ll make your taste buds do a little happy dance.This section dives deep into the ideal ingredients, from the perfect corn to the right black beans and the essential spices that’ll make your salsa sing.
We’ll also give you some alternative options, just in case your pantry isn’t stocked with the exact items listed. Think of this as your ultimate salsa ingredient cheat sheet!
Corn Choices
Fresh corn, the king of summer, is undeniably delicious. But, let’s be honest, sometimes it’s not readily available or budget-friendly. Frozen corn is a fantastic alternative, providing a similar texture and flavor without the need for a whole cornfield. Canned corn, while not as vibrant as fresh, still works well in a salsa. Each choice brings a unique quality to your salsa, so pick the one that best fits your needs and desires.
Black Bean Variety
Black beans aren’t all created equal. Kidney beans, for example, offer a distinct earthiness. Pinto beans have a mild, pleasant flavor that complements the salsa nicely. Even black beans, while the most common choice, can vary in texture and flavor depending on the brand. Ultimately, the choice is yours.
Experiment and see what you like best!
Essential Spices and Seasonings
Spice it up! Cumin, chili powder, and garlic powder are fundamental to a good black bean and corn salsa. They add depth and complexity to the overall flavor profile. But, don’t be afraid to get creative! A pinch of oregano, a dash of smoked paprika, or a squeeze of lime juice can elevate your salsa to the next level.
You can even add some diced jalapeño or serrano peppers for a spicy kick. The possibilities are endless!
Ingredient Quantities (Standard Batch)
| Ingredient | Quantity |
|---|---|
| Fresh or Frozen Corn (Kernels) | 4 cups |
| Canned Black Beans (drained and rinsed) | 2 (15-ounce) cans |
| Red Onion (diced) | 1 medium |
| Jalapeño or Serrano Pepper (seeded and minced) | 1-2, to taste |
| Cumin | 1 tablespoon |
| Chili Powder | 1 teaspoon |
| Garlic Powder | 1/2 teaspoon |
| Salt | To taste |
| Lime Juice | 2 tablespoons |
Note: Adjust quantities to your liking. Taste as you go and add more spice or lime juice if desired. Also, remember to adjust the measurements based on the size of your jars and the desired amount of salsa.
Preparation and Recipes
Alright, peeps! Getting your black bean and corn salsa ready for the canning jar is like assembling a delicious little army of flavor bombs. We’re going to break down the process step-by-step, from chopping the veggies to getting the perfect seasoning balance. Get ready to salsa-fy your life!This section details the preparation of the ingredients, from chopping techniques to seasoning strategies, culminating in a foolproof canning recipe.
We’ll cover everything you need to know to make your salsa taste amazing and keep it safe for later enjoyment.
Chopping Techniques for Salsa Success
The way you chop your veggies directly impacts the texture and ultimately, the taste of your salsa. Proper chopping ensures even distribution of flavor and maximizes the deliciousness factor.
- Corn: For a nice, even bite, cut the kernels off the cob using a sharp knife. Then, roughly chop the kernels into small pieces. Imagine little, crunchy corn bits dancing in your mouth – that’s the goal.
- Black Beans: Rinse and drain your black beans. Then, roughly chop them into bite-sized pieces. You want them to have a bit of texture, not overly smooth. Think of them as little, protein-packed nuggets of goodness.
Seasoning Strategies for Flavorful Salsa
Seasoning is key to bringing out the best in your salsa. The right blend of spices and herbs can elevate your salsa from good to absolutely amazing.
- Start with a Base: Begin with a good base of salt and pepper. Adjust to your liking, but remember that salt can be increased during the canning process.
- Explore Flavor Combinations: Experiment with different combinations of spices. Cumin, chili powder, garlic powder, and onion powder are excellent choices for a flavorful kick. Try adding a pinch of smoked paprika for a smoky depth.
- Fresh Herbs: Fresh cilantro, chopped, adds a vibrant, refreshing touch. A few drops of lime juice can brighten the flavor and add a zing. Don’t be afraid to experiment with other fresh herbs like oregano or parsley.
Canning Recipe: Black Bean and Corn Salsa
This recipe provides a step-by-step guide to creating a delicious and safe black bean and corn salsa.
Yields: Approximately 6 pints of salsa
Prep time: 30 minutes
Canning time: 45 minutes
Ingredients:
6 cups fresh corn kernels
2 (15-ounce) cans black beans, rinsed and drained
1 red onion, diced
1 jalapeño, seeded and minced (optional)
2 tablespoons lime juice
1 tablespoon cumin
1 teaspoon chili powder
1/2 teaspoon garlic powder
1/4 teaspoon smoked paprika
Salt and pepper to taste
1/4 cup chopped cilantro
Step 1: Combine all ingredients in a large bowl. Gently toss to combine. Imagine all the flavors mingling and creating a beautiful symphony in your bowl.
Step 2: Taste and adjust seasonings. Add more salt, pepper, or lime juice to your liking.Remember, the flavor can intensify during canning. Be sure to adjust according to your taste preferences.
Step 3: Prepare your canning jars and lids. Ensure that your jars are clean and sterilized. This step is critical to prevent any contamination.Step 4: Ladle the salsa into the prepared jars, leaving about 1/2 inch of headspace. Remove any air bubbles. Wipe the rims clean and place the lids and rings on the jars.
Step 5: Process the jars in a boiling water bath for 45 minutes. This step is essential for ensuring the safety of your salsa.After the processing time, carefully remove the jars and let them cool completely.
Canning Procedures

Alright, food enthusiasts! We’re diving headfirst into the magical world of water bath canning. This isn’t rocket science, but it’s important to follow the right steps to ensure your black bean and corn salsa stays fresh and delicious for months to come. Think of it as a culinary time capsule, preserving the vibrant flavors of summer for a rainy-day snack.
Preparing Jars and Lids
Proper jar and lid preparation is crucial for a successful canning experience. First, you’ll need clean, sterilized jars. These should be free of any dirt or debris. Thoroughly wash them with hot, soapy water, then rinse and sanitize them in boiling water for 10 minutes. This kills any lingering bacteria that could potentially spoil your salsa.
Lids and rings also require attention. Make sure the lids are new, and the rings are in good condition. A worn ring can compromise the seal, leading to spoilage. Follow the manufacturer’s instructions for lid preparation.
Filling Technique
Precise filling is key to ensuring a proper seal. After your jars are sterilized, carefully ladle your hot salsa into them, leaving about 1/2 inch headspace. Headspace is the crucial gap between the salsa and the rim of the jar. This space allows for expansion during processing. Overfilling can lead to a poor seal, while underfilling leaves the jar vulnerable to contamination.
Remember, a full jar is not necessarily a successful jar.
Sealing and Processing
Now, let’s talk about sealing. Once the jars are filled, carefully place the lids and rings on top. Make sure the rings are tightened, but not overly so. Over-tightening can warp the lid or cause the jar to crack. After sealing the jars, it’s time for processing.
This is where you’ll place the jars in a boiling water bath.
Water Bath Canning Procedures
Water bath canning is a simple method that involves submerging the filled jars in boiling water for a specific time. This ensures that any remaining bacteria are eliminated, preventing spoilage.
- Positioning Jars: Carefully place the jars into a large, canning pot. Make sure the jars are not touching each other or the sides of the pot. This will allow for even heat distribution.
- Water Depth: Pour enough hot water into the pot to cover the jars by at least 1 inch. This ensures the jars are fully submerged in the boiling water.
- Maintaining Temperature: Bring the water to a rolling boil, then maintain a consistent rolling boil for the appropriate processing time. This is essential for the proper sterilization process.
Processing Times
The processing time depends on the size of the jar. Here’s a table to guide you:
| Jar Size | Processing Time (minutes) |
|---|---|
| Pint | 25 |
| Quart | 30 |
| Half-Gallon | 35 |
Processing times are crucial for ensuring the safety of your canned goods. Do not deviate from these guidelines.
After the processing time is complete, carefully remove the jars from the boiling water and allow them to cool completely on a wire rack. Proper cooling is essential for the jars to seal properly. Listen closely to the
thud* of the lids as they cool; this signifies the successful sealing of your jars.
Safety Considerations
Hey, food lovers! Canning is a fantastic way to preserve deliciousness, but safety is paramount. Think of it like a delicate dance—you need the right moves to avoid disaster and enjoy the fruits (or in this case, the salsa!) of your labor. Let’s dive into the crucial safety aspects of canning black bean and corn salsa.Proper canning procedures are essential to prevent the growth of harmful bacteria, which can lead to foodborne illnesses.
Neglecting these steps can be more than just a culinary mistake; it can be a serious health risk. So, pay close attention to the details and treat every step with the respect it deserves. Remember, a little extra care goes a long way in preserving not only your salsa but also the health of those who enjoy it.
Importance of Food Safety in Canning
Safe canning techniques are vital to prevent the growth of harmful microorganisms like Clostridium botulinum, a potentially deadly bacteria. Improper canning methods create an environment where these organisms can thrive, leading to food poisoning. Ensuring the right temperature and pressure during the canning process is crucial to eliminating these threats. Focus on cleanliness throughout the entire process; a contaminated environment can quickly become a breeding ground for dangerous bacteria.
Risks Associated with Improper Canning Procedures
Improper canning procedures can result in a variety of hazards. Foodborne illnesses are the most obvious risk, ranging from mild stomach upset to severe complications. Spoiled food can also lead to a loss of the food itself and the waste of ingredients. Beyond the health implications, there’s also the potential economic loss of wasted resources and time spent preparing and canning the food.
Furthermore, the lack of proper sealing can lead to a contaminated product, posing health risks to consumers.
Importance of Checking for Proper Seals
Checking the seals of your canned salsa is a crucial step in the canning process. A properly sealed jar indicates that the vacuum created during processing effectively removes air and prevents microbial growth. If the jar doesn’t seal properly, it creates a breeding ground for harmful bacteria and renders the food unsafe to consume. A proper seal is vital for both preserving the food’s quality and safety.
Identifying Spoiled Canned Salsa
Recognizing spoiled canned salsa is critical. Look for bulging or swelling on the lids, as this suggests pressure buildup from bacterial activity. A warped or cracked lid also indicates a compromised seal. Any visible signs of liquid or discoloration in the salsa itself should be a red flag. Don’t risk it—discard any canned salsa that shows these symptoms immediately.
Common Canning Safety Mistakes and Solutions
| Mistake | Solution |
|---|---|
| Not using a pressure canner for high-acid foods like salsa | Use a pressure canner to ensure proper temperature and pressure to eliminate any harmful bacteria. This is especially crucial for low-acid foods. |
| Skipping the pre-canning sterilization of jars and lids | Thoroughly clean and sterilize all jars and lids to remove any potential contamination. Boiling them in water for 10 minutes is a safe method. |
| Insufficient processing time | Follow the recommended processing time for your recipe. This is often crucial to ensure that the food reaches a safe temperature for the specific recipe. |
| Not checking the seals after processing | Carefully check each jar’s seal after processing to ensure that a vacuum has formed. A proper seal is crucial for food safety. |
| Storing canned salsa in unsuitable conditions | Store canned salsa in a cool, dark, and dry place to prevent deterioration. Excessive heat or moisture can damage the product and compromise its safety. |
Variations and Alternatives
Spice up your canned black bean and corn salsa! Beyond the basic recipe, there’s a whole world of flavor possibilities waiting to be unlocked. From adding a kick of heat to experimenting with different types of beans, this section will guide you through the exciting realm of variations, letting you craft a salsa that perfectly suits your taste buds.
Spice Level Adjustments
Adding heat to your canned salsa is a straightforward process. You can adjust the spiciness by incorporating different chili peppers. Mild varieties like serrano peppers or jalapeños can provide a subtle heat, while habaneros or Scotch bonnets will deliver a more intense punch. For a smoother, less intense flavor, consider using chili powder or a pinch of cayenne pepper.
Remember to adjust the amount to your preferred level of spiciness.
Vegetable Variations
Expanding your salsa’s vegetable profile can significantly impact its taste and texture. Adding finely diced red onion brings a tangy sweetness that complements the beans and corn beautifully. Chopped bell peppers, whether green, yellow, or orange, add vibrant color and a touch of sweetness or slight bitterness depending on the variety. For a smoky flavor, roasted red peppers provide an exceptional depth.
Bean and Corn Alternatives
While black beans and corn are the stars of this salsa, you can explore alternatives to create unique flavors. Kidney beans, pinto beans, or even chickpeas offer different textural and flavor profiles. Different types of corn, such as sweet corn or creamed corn, can change the overall sweetness of the salsa. The key is to choose ingredients that complement each other and enhance the overall taste.
Spice Combinations
Experiment with a variety of spice blends to elevate the flavor of your canned salsa. A touch of cumin adds a warm, earthy aroma. Coriander or smoked paprika can add depth and complexity to the spice profile. A dash of garlic powder or onion powder provides savory notes that harmonize with the other flavors. Don’t be afraid to mix and match these spices to discover your own unique combinations.
Serving Suggestions
Beyond the traditional taco and burrito, canned black bean and corn salsa offers a diverse range of culinary applications. Use it as a topping for nachos, adding a flavorful crunch. Spoon it over grilled fish or chicken for a refreshing twist. Mix it into a vibrant salad for a burst of color and flavor. Even consider using it as a base for a creamy soup, or as a spread for sandwiches.
The possibilities are truly endless.
Troubleshooting and Storage: Canning Recipe For Black Bean And Corn Salsa
So, you’ve successfully canned your black bean and corn salsa. Now, the real test begins—keeping it delicious and safe for months to come. A little bit of foresight can prevent a lot of heartache, trust me. This section will cover potential problems, proper storage, extending shelf life, and the crucial step of checking those seals. It’s all about avoiding those post-canning disasters.Proper storage and troubleshooting are key to enjoying your homemade salsa for months to come.
Knowing how to deal with any hiccups in the canning process is essential. This section will equip you with the knowledge to maintain the quality and safety of your canned salsa, ensuring you can enjoy your hard work for a long time.
Potential Canning Problems and Solutions
Proper canning procedures are crucial for preventing spoilage and ensuring the safety of your homemade salsa. Following the recommended steps, using the right equipment, and paying close attention to detail is important to avoid issues. Here are some common problems and their solutions:
| Problem | Solution |
|---|---|
| Jar Doesn’t Seal | Ensure the jars were properly prepared (cleaned and sanitized), and that the lids and rings were correctly placed on the jars. If the seal still isn’t forming, you might need to adjust the processing time or temperature. |
| Leaking Jars | Leaking jars usually indicate a faulty seal. Discard the contents and start again, meticulously checking each step of the process. It could be a slight imperfection in the jar or lid, or the filling wasn’t even. |
| Mold or Spoilage in the Jars | Discard any jars showing signs of mold or spoilage immediately. Do not consume the contents. Spoilage can happen if the jars weren’t properly processed or if there were contamination issues. |
| Cloudy Salsa | A cloudy salsa might indicate that the ingredients weren’t properly combined, or perhaps there was a problem during the canning process. Try adjusting the ingredients’ ratios, and always ensure the proper processing time. |
Proper Storage of Canned Salsa
Proper storage of canned salsa is crucial for preserving its quality and safety. Storing canned goods in a cool, dark, and dry place is vital for maintaining their shelf life. Avoid storing them near heat sources or moisture-prone areas.
- Store canned salsa in a cool, dark pantry or cupboard. A basement or a cellar, if you have one, is a great choice, but not always available to everyone. Temperature fluctuations can affect the quality and safety of the contents.
- Avoid storing canned salsa in direct sunlight or near heat sources. Heat can accelerate the degradation of the salsa and affect the safety of the contents.
- Always check the expiration date or best-by date. Even if a jar looks perfect, the ingredients might have already gone past their prime.
Extending Shelf Life of Canned Salsa
Extending the shelf life of canned salsa involves maintaining ideal storage conditions. Proper storage and techniques are essential to maximize the duration of your canned salsa. It’s important to remember that even with the best practices, the shelf life will eventually decrease.
- Store the jars in a cool, dark place to slow down the spoilage process. This will keep the salsa fresh for a longer time.
- Avoid storing the jars in areas with high humidity. Excessive moisture can affect the quality of the contents. Try to avoid storing in areas prone to moisture issues.
- Regularly inspect the jars for any signs of damage or spoilage. If you see any issues, discard the contents immediately.
Checking for Proper Seals After Cooling
Checking for proper seals after cooling is essential to ensure the safety and quality of your canned salsa. It is a crucial step in the canning process.
This canning recipe for black bean and corn salsa is a fantastic summer treat. Finding the perfect ingredients is key, but if you’re looking for a luxurious car to complement your delicious homemade salsa, consider checking out the Cadillac dealerships in Cincinnati, Ohio here. The vibrant flavors of the salsa will pair perfectly with your next summer barbecue, no matter what vehicle you’re driving.
Now, back to the salsa!
- Properly sealing the jars is essential to prevent spoilage. This step ensures that the contents are safe for consumption and that the quality of the product is maintained.
- Check for any bulging or leaking. These signs could indicate that the seal isn’t properly formed, which might lead to contamination or spoilage.
- Always follow the recommended guidelines for processing time and temperature to guarantee the integrity of the seal.
Visual Aids and Illustrations
Okay, so you’ve got your black bean and corn salsa recipe all figured out, now let’s talk visuals. Imagine this: perfectly preserved salsa, bursting with flavor, ready to be enjoyed months from now. Visual aids aren’t just pretty pictures; they’re your guides, your safety nets, your proof that you did it right.
Properly Sealed Jar
A properly sealed jar is the ultimate testament to your canning prowess. It’s a sight that screams confidence and a promise of deliciousness to come. Look for a jar that’s firmly sealed, with no visible gaps or cracks around the lid’s perimeter. The lid itself should appear to be firmly pressed down on the jar, creating a tight, air-tight seal.
Think of it as a little fortress, protecting your salsa from unwanted intruders. A perfect seal prevents spoilage and ensures your delicious creation remains intact.
Spoiled Salsa
Spotting spoiled salsa is crucial for food safety. Unfortunately, spoiled salsa isn’t pretty. It might show signs of bubbling, mold, or an off-putting smell. The salsa itself might have an unusual color, or it might have a slimy texture. If you notice any of these signs, toss the entire jar and contents.
This canning recipe for black bean and corn salsa is a fantastic way to enjoy fresh flavors all year round. For a more substantial meal, explore delicious options like those found in recipes for 7 quart slow cooker , which can easily be adapted to include the same vibrant salsa as a side dish. The perfect complement to any summer barbecue, this canned salsa is sure to become a family favorite!
Your taste buds will thank you. Better to be safe than sorry, right?
Identifying a Properly Sealed Jar
A properly sealed jar is one that’s absolutely crucial for successful canning. You can identify a properly sealed jar by checking the lid. The lid should be pressed down firmly, without any gaps or spaces. Look for a slight concave curve on the lid. This means the vacuum seal has been formed successfully, creating a perfect seal that prevents air and unwanted microorganisms from entering.
If the lid doesn’t show a concave curve, or if it appears to be bulging or has any cracks, it indicates a possible seal failure.
Canning Process Steps
Visualizing the canning process is like having a roadmap to success. Each step is important, and seeing them in action helps you understand the crucial elements for perfect results. Imagine each step as a vital stage in your salsa’s transformation, from preparation to preservation. This visual guide is key to ensuring your salsa remains fresh for months.
- Preparing the Jars: Clean, sterilized jars are the foundation of successful canning. This step involves meticulously washing the jars in hot, soapy water, then rinsing thoroughly. Proper sterilization ensures the elimination of any harmful bacteria that could spoil your salsa. The jars should be placed in a hot water bath for the specified amount of time to remove any lingering bacteria.
- Filling the Jars: Carefully and completely fill the jars with your black bean and corn salsa. Leave a small headspace (about 1/2 inch) at the top of the jar to allow for expansion during the canning process. This is crucial to avoid potential pressure buildup in the jar.
- Adding the Lids and Rings: Carefully place the lids on the jars, making sure they are centered. Then, carefully place the rings on top of the lids. Tighten the rings firmly, but not excessively, to create an adequate seal.
- Processing the Jars: Carefully place the jars in a boiling water bath and ensure they are completely submerged in the water. The processing time will vary based on your altitude and specific recipe. The temperature of the water should be carefully monitored and maintained throughout the processing period.
Handling Hot Jars and Lids
Handling hot jars and lids requires caution. Use pot holders or oven mitts to protect your hands. The jars and lids will be hot from the processing, so take care not to burn yourself. Handling them carefully will prevent burns and ensure the safety of the canning process. Using tongs or a jar lifter is highly recommended to prevent accidental burns when transferring hot jars.
Proper handling is key to both your safety and the integrity of your delicious salsa.
Ending Remarks
So, ditch the store-bought salsa and embrace the satisfying thrill of canning your own black bean and corn salsa. This recipe provides a detailed and comprehensive approach to canning, covering every step from preparation to storage. With a little patience and these expert tips, you’ll be enjoying your homemade salsa all year long. Get ready to impress your friends and family with this mouthwatering, homegrown treat!
Helpful Answers
What kind of corn is best for this salsa?
Fresh corn kernels are ideal for the freshest flavor, but frozen or canned corn will work in a pinch. Just be sure to use the correct amount for the recipe.
Can I use different types of beans?
Absolutely! Kidney beans, pinto beans, or even black beans are all great options. Adjust the seasonings to suit your chosen beans.
How long does canned salsa last?
Properly canned salsa, stored in a cool, dark place, can last for several years. Always check the seal before opening!
What if I don’t have a pressure canner?
No problem! This recipe focuses on the water bath method, which is perfectly suitable for this salsa.
